Did you know that toilets are one of the most frequently used items in a household, with the average person using it about 2,500 times a year? With such heavy usage, it’s no wonder that toilet problems are a common occurrence.
From running toilets to leaks and clogs, these issues can be a source of frustration and inconvenience. Thankfully, many common toilet problems can be easily fixed with a bit of DIY know-how and troubleshooting.
In this article, we’ll guide you through the different parts of a toilet, how they work, and the step-by-step process of troubleshooting and repairing common toilet issues. You’ll learn valuable tips and techniques to address running toilets, leaks, clogs, and more, saving you time, money, and the need to call in a professional plumber.
Key Takeaways:
- Toilets are used approximately 2,500 times a year in a household.
- Common toilet problems include running toilets, leaks, and clogs.
- Many toilet issues can be fixed with DIY troubleshooting and repairs.
- By understanding the parts and mechanisms of a toilet, you can tackle problems effectively.
- Follow local guidelines and safety precautions when attempting DIY toilet repairs, and contact a licensed plumber if needed.
Understanding How a Toilet Works
A toilet consists of two main parts – the bowl and the tank. The tank holds the water used for flushing, while the bowl is the drain fixture. The flush valve and fill valve are essential components in the tank that allow for proper flushing. The flush valve releases water from the tank into the bowl, while the fill valve refills the tank after a flush. Understanding how these mechanisms work is crucial for troubleshooting toilet issues.
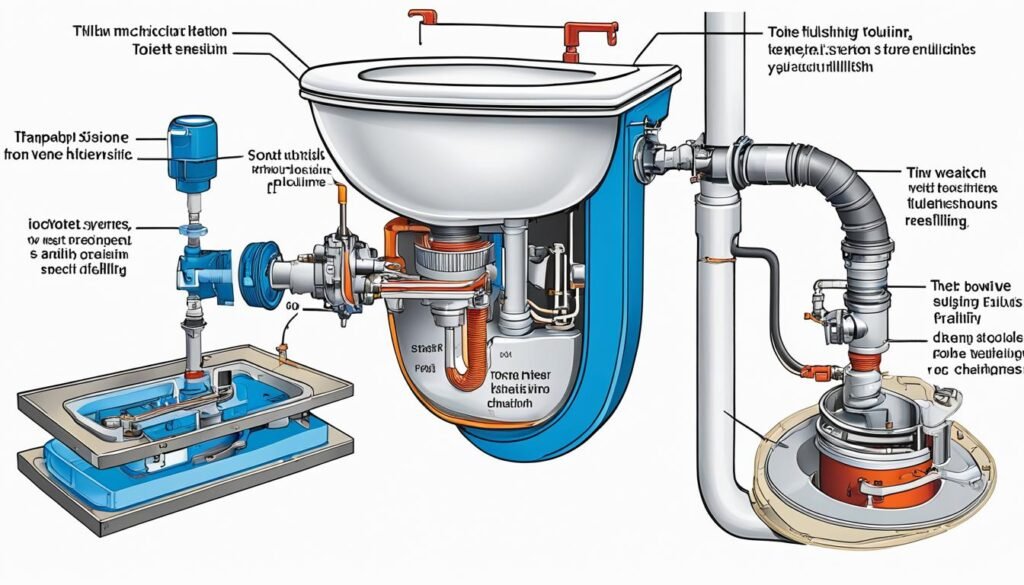
When you press the flush handle or button, it lifts the flush valve, allowing water to flow from the tank into the bowl. The force of the water pushes waste down the drain and refills the bowl with clean water. The fill valve senses when the tank is empty and opens the water supply line to refill the tank to the appropriate level.
The flush valve and fill valve work together to ensure efficient flushing and proper water flow. If either of these valves is malfunctioning, it can lead to issues such as a weak flush, incomplete filling, or constant running of the toilet. By understanding the mechanics of your toilet, you can identify and resolve these problems effectively.
Basic Toilet Repairs: Before You Begin
Before undertaking any DIY toilet repairs, it is crucial to familiarize yourself with your local codes and guidelines. Following these rules ensures that the repairs are done safely and in compliance with regulations. However, if you are uncertain about the repairs or have doubts about your ability to complete them, it is recommended to seek the assistance of a licensed plumber from Local Plumbers 4 U. They have the expertise and knowledge to handle any complex toilet repair issues you may encounter.
When working on a toilet, it’s essential to handle connectors and fasteners with care. These components are delicate and can easily be damaged if mishandled. Using too much force or improper tools can result in costly damages that could have been avoided with proper care.
Another important consideration is using the correct replacement parts. Each toilet model has specific components that are designed to fit and function correctly within that system. Using incompatible parts can cause further damage or lead to recurring issues, compromising the effectiveness of your repair efforts. Local Plumbers 4 U can guide you in selecting the appropriate replacement parts for your specific toilet model.
Before starting any repair work on your toilet, take the necessary precautions to ensure your safety and minimize any potential damage. Turn off the water supply to the toilet and empty the tank completely. This step prevents any accidental flooding or water damage during the repair process. Additionally, it is always a good practice to wear protective gloves and eyewear when dealing with toilet repairs, especially if you’re working with plumbing or sewage connections.
By following these basic guidelines and seeking professional assistance when necessary, you can confidently tackle DIY toilet repairs and maintain the proper functionality of your toilet system.
Quick Tips:
- Follow local codes and guidelines for toilet repairs.
- Contact a licensed plumber for complex repairs or if unsure.
- Handle connectors and fasteners with care.
- Use the correct replacement parts for your toilet model.
- Turn off the water supply and empty the tank before starting repairs.
- Wear protective gloves and eyewear during toilet repairs.
| Why follow local codes and guidelines? | Why contact a licensed plumber? | Why handle connectors and fasteners with care? |
|---|---|---|
| Ensures compliance and safety | Expertise in complex repairs | Prevents damage to delicate components |
| Reduces the risk of fines or penalties | Knowledge of local regulations | Avoids additional repair expenses |
| Promotes long-term functionality | Proper diagnosis of issues | Preserves the integrity of the toilet system |
Fixing a Constantly Running Toilet
A constantly running toilet can be a major nuisance, not to mention a significant source of water wastage and increased water bills. Fortunately, the most common cause of a running toilet is relatively easy to fix.
Identifying the Problem: Flapper or Flush Valve Assembly?
When a toilet continuously runs, it’s often due to a faulty flapper or an issue with the flush valve assembly. The flapper is a rubber valve that opens to allow water to flow from the tank into the bowl during a flush, and then closes to prevent water from continuously flowing. Over time, the flapper may become worn out, torn, or misaligned, resulting in water leakage and a never-ending flush. On the other hand, if the flapper seems fine, the problem may lie with the flush valve assembly, which controls the release of water from the tank into the bowl.
Checking the Flapper
To determine if the flapper is the culprit, remove the toilet tank lid and inspect the condition of the flapper. Look for any signs of damage, such as cracks, tears, or mineral buildup. Additionally, ensure that the flapper is properly aligned and sealing the flush valve opening when not in use.
If the flapper is damaged or not properly sealing, it’s time for a replacement. Fortunately, flappers are readily available at your local home improvement store or hardware store. Look for a flapper that matches the size and style of your current flapper, and follow the manufacturer’s instructions for installation.
Replacing the Flush Valve Assembly
If replacing the flapper did not resolve the running toilet issue, it’s possible that the problem lies with the flush valve assembly. This assembly consists of various components, including the flush valve itself, the overflow tube, and the fill valve. If any of these parts are faulty or malfunctioning, it may cause the toilet to continuously run.
To replace the flush valve assembly, it’s recommended to consult the manufacturer’s instructions specific to your toilet model. Alternatively, you can seek the assistance of a professional plumber for a seamless replacement process.
Summary
A running toilet not only wastes water but can also lead to higher water bills. By checking and replacing the flapper or flush valve assembly, you can effectively resolve this issue and restore your toilet’s proper functionality.
| Steps to Fix a Running Toilet | Benefits |
|---|---|
| Inspect the flapper for damage or misalignment. | – Prevent water wastage – Improve toilet efficiency |
| Replace the flapper if necessary. | – Restore proper sealing – Eliminate continuous flushing |
| Consult manufacturer’s instructions or seek professional help for replacing the flush valve assembly. | – Address underlying causes of continuous running – Ensure long-term solution |
Addressing a Leaking Toilet
Leaking toilets can cause significant water damage to your floor and subfloor if left unaddressed. To prevent further damage, it’s crucial to identify and fix the source of the leak promptly. Here are some steps you can take to address a leaking toilet:
- Check the supply line connection: Inspect the connection between the toilet’s supply line and the water shut-off valve. If you notice any signs of leakage, such as water pooling around the connection, try tightening the nuts using pliers. This simple adjustment can often resolve minor supply line leaks.
- Inspect the tank-to-bowl bolts: The bolts securing the tank to the bowl can sometimes become loose over time, causing leaks from the base of the toilet. Using a wrench, carefully tighten the bolts until they are snug. Be cautious not to overtighten them, as it can crack the porcelain.
- Consider replacing the bolts and gasket: If tightening the tank-to-bowl bolts doesn’t stop the leak, it may be necessary to replace them. Remove the old bolts and gasket, and install new ones to ensure a proper seal. This replacement should effectively resolve leaks originating from the tank base.
- Check the mounting bolts and wax ring: Leaks around the base of the toilet or on the ceiling below the bathroom indicate problems with the mounting bolts or the wax ring that seals the connection between the toilet and waste pipe. Inspect the mounting bolts for any signs of corrosion or damage. If necessary, tighten them using a wrench. Additionally, examine the wax ring for any deterioration or displacement. If the wax ring seems compromised, consider replacing it to create a proper seal.
By addressing toilet leaks promptly, you can prevent water damage and potential structural issues in your bathroom. If the leak persists or if you are unsure about any repair steps, it is advisable to consult a licensed plumber for professional assistance.
| Causes of Toilet Leaks | Potential Solutions |
|---|---|
| Loose supply line connection | Tighten the nuts connecting the supply line to the water shut-off valve |
| Leak from tank base | Tighten the tank-to-bowl bolts or replace them if necessary |
| Leak at the toilet base | Check and tighten the mounting bolts or replace the wax ring |
Dealing with a Clogged Toilet
A clogged or slow-flushing toilet can be a frustrating experience. When faced with this issue, there are several methods you can try to unclog your toilet before calling a plumber.
Start with a Plunger:
If you notice that your toilet is not draining properly, using a plunger is often the first step in resolving the clog. Make sure there is enough water in the bowl to cover the plunger’s head, and then firmly press the plunger up and down to create suction. Repeat this motion several times, and the force of the plunging action may dislodge the clog and allow the water to flow freely.
Try using a Toilet Auger:
If the plunger fails to remove the clog, you can try using a toilet auger. A toilet auger extends into the toilet drain and can break up or remove stubborn clogs. Insert the end of the auger into the drain, and rotate the handle clockwise while applying steady pressure. This action can help break up the clog and restore proper drainage.
Consider a Chemical Drain Opener:
If the clog persists despite your efforts with a plunger or toilet auger, you may want to use a chemical drain opener. These products are designed to dissolve organic materials that often cause toilet clogs. Follow the instructions on the label carefully and take appropriate safety precautions when using chemical drain openers.
If none of these methods successfully unclog your toilet, it may be time to call a professional plumber. They have the expertise and equipment to handle more severe clogs and can ensure that your toilet is functioning properly.
Remember:
Avoid using excessive force when attempting to unclog your toilet, as this can cause damage to the plumbing system.
Regular maintenance, such as avoiding flushing excessive amounts of toilet paper or foreign objects, can help prevent toilet clogs in the future. By knowing the appropriate steps to take when faced with a clogged toilet, you can resolve the issue quickly and efficiently.
Troubleshooting a Slow-Filling Toilet
If your toilet is slow to fill with water, there are a few potential causes to consider. Start by checking that the water supply valve is fully open. Sometimes, the valve may not be turned on all the way, resulting in a slow fill. Ensure that the valve is fully open by turning it counterclockwise.
If the water supply valve is fully open and the problem persists, the issue may lie with the fill valve assembly. The fill valve is responsible for controlling the flow of water into the toilet tank. Over time, the fill valve can become dirty or worn, hindering its functionality.
To address the issue, you can start by cleaning the fill valve. Turn off the water supply to the toilet and flush it to drain the tank. Remove the fill valve assembly, following the manufacturer’s instructions. Use a brush or cloth to clean any debris or mineral buildup from the valve components. Once clean, reassemble the fill valve and turn on the water supply. Check if the slow-filling issue has been resolved.
If cleaning the fill valve doesn’t solve the problem, you may need to replace the fill valve assembly. Ensure that you purchase the correct replacement part that is compatible with your toilet model. Follow the manufacturer’s instructions to remove the old fill valve and install the new one.
It’s also important to check for any debris or obstructions that may be preventing the fill valve from functioning properly. Inspect the water line and other components within the toilet tank for any blockages. Clear any debris that you find to ensure a smooth flow of water.
Troubleshooting a Slow-Filling Toilet - Summary:
- Check that the water supply valve is fully open.
- Clean the fill valve assembly to remove any debris or mineral buildup.
- If cleaning doesn’t work, replace the fill valve assembly with a compatible replacement.
- Inspect and clear any debris or obstructions that may be impeding the fill valve’s functionality.
The Problem of Noisy or Loose Toilet Lids
Noisy or loose toilet lids can be quite bothersome, and if left unattended, they can even cause damage to your toilet. Fortunately, there are simple solutions to address these issues and restore peace and stability to your bathroom.
To quiet down a noisy toilet seat, start by lubricating the seat hinges. Apply a few drops of lubricant, such as WD-40 or a silicone-based spray, to the moving parts of the hinges. Move the seat up and down a few times to evenly distribute the lubricant and reduce the noise. If lubrication doesn’t solve the problem, it may be necessary to replace the hinges.
In case the toilet seat lid is constantly slamming shut, causing inconvenience and potential damage, consider installing bumpers or a slow-close lid mechanism. Bumpers are small adhesive pads that can be placed strategically on the seat and the lid to absorb the impact of closing and prevent noise. Alternatively, a slow-close lid mechanism allows the lid to close gently and quietly, providing a more peaceful bathroom experience.
If you have noticed that your toilet seat is cracked or wobbly, it’s essential to take action to prevent further damage and ensure your comfort. Start by tightening the bolts that connect the toilet seat to the bowl. Use a screwdriver or a wrench to secure the bolts firmly but be careful not to overtighten them, as this could cause the seat to crack. If the bolts are already tight and the seat is still wobbly, it may be time to replace the entire seat. Choose a new seat that fits your toilet model and follow the manufacturer’s instructions for installation.
By addressing noisy or loose toilet lids promptly, you can enhance the functionality and comfort of your bathroom. Remember to regularly check the condition of your toilet seat hinges, and if needed, lubricate or replace them to prevent noise. Installing bumpers or a slow-close lid mechanism can also make a significant difference in reducing noise and preventing damage. Finally, addressing cracks or wobbliness in the toilet seat by tightening bolts or replacing the seat altogether will ensure a stable and comfortable bathroom experience.
Understanding Low Water in the Toilet Bowl
A low water level in the toilet bowl can be a frustrating issue, but it is often a sign of a simple problem that can be easily fixed. There are a few potential causes for low water levels, including issues with the fill tube or float adjustment.
To resolve low water levels in the bowl, follow these steps:
- Check the Fill Tube: The fill tube is responsible for refilling the toilet bowl after each flush. First, ensure that the fill tube is properly positioned and securely connected to the overflow tube. If the fill tube is damaged or disconnected, it may be causing reduced water flow into the bowl.
- Adjust the Float: The float is a mechanism that controls the water level in the tank. If the float is set too low, it can result in insufficient water entering the bowl. Adjust the float by either bending the rod holding it or adjusting the float valve. Test the water level after each adjustment to determine the optimal float position.
If you’ve checked the fill tube and adjusted the float, but the low water level issue persists, debris may be blocking the bowl’s inlet holes. Clean the inlet holes using a small wire or pipe cleaner to remove any obstructions.
Expert Tip:
Be cautious while adjusting the float as water levels that are too high can result in constant running and overflowing toilets. It’s best to make small adjustments and test the water level after each one.
By following these steps and troubleshooting the fill tube, float, and inlet holes, you can often resolve low water levels in the toilet bowl. However, if the issue persists or you’re uncertain about performing these repairs yourself, it’s recommended to contact a professional plumber for assistance.
No Water in the Toilet Tank
If you find that there is no water in your toilet tank, there are a few things you can check to identify and resolve the issue. Start by ensuring that the water supply valve, usually located on the wall behind the toilet, is fully open. Sometimes, the valve may have been accidentally closed, causing a lack of water in the tank.
Additionally, inspect the water supply line for any visible leaks. A leak in the supply line can lead to inadequate water flow into the tank. If you notice any leaks, it’s important to address them promptly to prevent further water wastage and potential damage.
If the water level in the tank is unusually low, the float arm may need adjustment or the fill valve may need to be replaced. The float arm controls the water level, so it’s essential to ensure that it is positioned correctly for the proper functioning of the fill valve.
To resolve this issue, you can adjust the float arm by gently bending it either downward to let more water in or upward to reduce the water level. Be cautious while making adjustments to avoid damaging the float arm or the fill valve assembly.
If adjusting the float arm doesn’t restore the water level, you might need to replace the fill valve. The fill valve is responsible for regulating the flow of water into the tank, so a faulty or worn-out valve can result in insufficient water supply.
To replace the fill valve, you’ll need to detach it from the tank following the manufacturer’s instructions. Once removed, you can install a new fill valve that is compatible with your toilet model. Make sure to turn off the water supply and empty the tank before removing the fill valve to prevent any water spills.
Remember, if you’re unsure about how to adjust or replace the fill valve, or if you encounter any difficulties during the process, it’s always best to contact a professional plumber for assistance.
| Common Causes of No Water in the Toilet Tank | Solutions |
|---|---|
| The water supply valve is closed | Open the water supply valve fully |
| A leak in the water supply line | Inspect and repair any leaks in the supply line |
| Incorrect float arm adjustment | Adjust the float arm to achieve the desired water level |
| Malfunctioning fill valve | Replace the fill valve with a new one |
Causes and Solutions for Toilet Leaks
Toilet leaks can be a common and frustrating problem that can lead to water damage if left unaddressed. Understanding the causes of toilet leaks and knowing how to fix them is essential for maintaining a functional and efficient bathroom.
The main areas where toilet leaks can occur are the water supply, the tank-to-bowl connection, and the wax ring.
Water Supply
One of the potential causes of a toilet leak is a problem with the water supply. Check the water supply line and ensure that it is securely connected to the toilet tank. If there are any visible signs of leaking or loose connections, tighten the fittings or replace the supply line if necessary.
Tank-to-Bowl Connection
The connection between the tank and bowl can also be a source of toilet leaks. Inspect the bolts that secure the tank to the bowl and make sure they are tight. If the bolts are loose, tighten them using a wrench. If the leak persists, it may be necessary to replace the bolts and the gasket between the tank and bowl to ensure a proper seal.
Wax Ring
The wax ring is a crucial component that seals the toilet flange to the drain opening. Over time, the wax ring may wear out or become damaged, leading to leaks at the base of the toilet. To fix this issue, you’ll need to remove the toilet and replace the wax ring. Be sure to follow proper procedures and use a new wax ring that is the correct size for your toilet.
Remember, addressing toilet leaks promptly is key to preventing further damage and conserving water. If you’re unsure about the cause of the leak or need assistance with the repairs, don’t hesitate to reach out to a professional plumber.
“A leaking toilet can lead to water damage if not fixed promptly. Check the water supply, the tank-to-bowl connection, and the wax ring for potential issues.” – Expert Plumber
| Common Causes of Toilet Leaks | Solutions |
|---|---|
| Loose water supply line | Tighten or replace the supply line |
| Loose or damaged tank-to-bowl bolts | Tighten bolts or replace gasket |
| Worn-out or damaged wax ring | Remove toilet and replace wax ring |
Conclusion
Troubleshooting common toilet problems can save you time, money, and the hassle of calling a plumber. By understanding how your toilet works and following the appropriate steps, you can easily fix many issues yourself. Remember to always follow local codes and guidelines, and don’t hesitate to contact a licensed plumber if you’re unsure or have more complex problems.
With the expert DIY tips provided in this article, you can confidently address a range of toilet troubles. Whether it’s a constantly running toilet, a leaking tank, a clog, or a slow-filling bowl, you now have the knowledge to tackle these issues on your own. By taking the time to troubleshoot and resolve these problems, you’ll maintain the functionality and efficiency of your toilet for years to come.
By avoiding unnecessary water wastage and potential damage to your property, you’ll also contribute to a greener environment. Remember, small repairs and maintenance can go a long way in preventing major issues down the line. Regularly inspecting, cleaning, and maintaining your toilet will help prevent costly repairs and ensure its longevity.
FAQ
How does a toilet work?
A toilet consists of two main parts – the bowl and the tank. The tank holds the water used for flushing, while the bowl is the drain fixture. The flush valve and fill valve are essential components in the tank that allow for proper flushing. The flush valve releases water from the tank into the bowl, while the fill valve refills the tank after a flush.
What should I consider before attempting DIY toilet repairs?
Before attempting any DIY toilet repairs, it’s important to follow local codes and guidelines. If you’re unsure about the repairs or have doubts, it’s best to contact a licensed plumber from Local Plumbers 4 U. When working on a toilet, handle connectors and fasteners with care to avoid damaging them. Make sure to use the correct replacement parts and take necessary precautions when turning off the water supply and emptying the tank.
How can I fix a constantly running toilet?
A constantly running toilet can waste water and increase your water bills. In many cases, the problem lies with the flapper not sealing the flush valve opening or a faulty flush valve assembly. Check the condition of the flapper, and if it’s damaged or not sealing properly, replace it. If replacing the flapper doesn’t solve the issue, you may need to replace the entire flush valve assembly.
How can I address a leaking toilet?
Leaking toilets can cause water damage to your floor and subfloor. If you notice a leak at the supply line connection, tighten it if needed. Check the bolts securing the tank to the bowl and tighten them if the leak is from the tank base. If the leak persists, replace the bolts and the gasket between the tank and toilet base. For leaks where the toilet meets the floor or on the ceiling below the bathroom, check the mounting bolts and the wax ring that seals the connection between the toilet and waste pipe.
What can I do to unclog a toilet?
A clogged or slow-flushing toilet can be frustrating. Start by using a plunger, making sure there is enough water in the bowl to cover the plunger’s head. If that doesn’t work, try using a toilet auger to remove the clog. If the clog persists, you can use a chemical drain opener, following the instructions carefully. If none of these methods work, it’s time to call a plumber.
How can I troubleshoot a slow-filling toilet?
If your toilet is slow to fill with water, check that the water supply valve is fully open. If it is, then the issue may lie with the fill valve assembly. Clean the fill valve or replace it if necessary. Ensure that there are no debris or obstructions preventing the fill valve from working correctly.
What can I do to fix a noisy or loose toilet lid?
Noisy or loose toilet lids can be annoying and may damage your toilet. To quiet down a noisy toilet seat, lubricate the seat hinges or replace them if necessary. If the toilet seat lid is slamming, consider installing bumpers or a slow-close lid. If the toilet seat is cracked or wobbly, tighten the bolts or replace the entire seat.
How can I address low water in the toilet bowl?
A low water level in the toilet bowl may indicate a problem with the fill tube or float adjustment. Check that the fill tube is properly positioned and flowing into the overflow tube. Adjust the float to ensure the correct water level in the bowl. If the problem persists, inspect the bowl’s inlet holes for debris and clean them if necessary.
What should I do if there is no water in the toilet tank?
If there is no water in the toilet tank, ensure that the water supply valve is fully open. Check the water supply line for leaks as well. If the water level in the tank is too low, the float arm may need adjustment or the fill valve may need replacing. Detach the fill valve and replace it if necessary.
How can I identify and fix toilet leaks?
Toilet leaks can occur at various points, including the water supply, the tank-to-bowl connection, and the wax ring. Ensure that all connections are secure and not leaking. If there are cracks in the tank or bowl, they may need replacing. If water is leaking from the base of the toilet, the wax ring that seals the toilet flange to the drain opening may need to be replaced.
How can I troubleshoot common toilet problems?
Troubleshooting common toilet problems can save you time, money, and the hassle of calling a plumber. By understanding how your toilet works and following the appropriate steps, you can easily fix many issues yourself. Remember to always follow local codes and guidelines, and don’t hesitate to contact a licensed plumber if you’re unsure or have more complex problems.